The blur effect is a visual enhancement technique used in graphic design and user interface development to create a sense of depth, focus, or aesthetic appeal.
In SwiftUI, the blur effect is achieved using the blur modifier. This modifier allows developers to apply a blur to any SwiftUI view.
How do you make a blur effect in SwiftUI?
Implementing a blur effect in SwiftUI is straightforward. All we need to do is to use the .blur modifier. To set the intensity of the blur effect, we need to set the “radius” parameter — the higher the number the more blur effect.
In the following example, we will create a blur effect over a text element:
import SwiftUI

struct BlurView: View {
    var body: some View {
        Text("Hello, blur effect")
            .blur(radius: 2.5)
    }
}
The result:

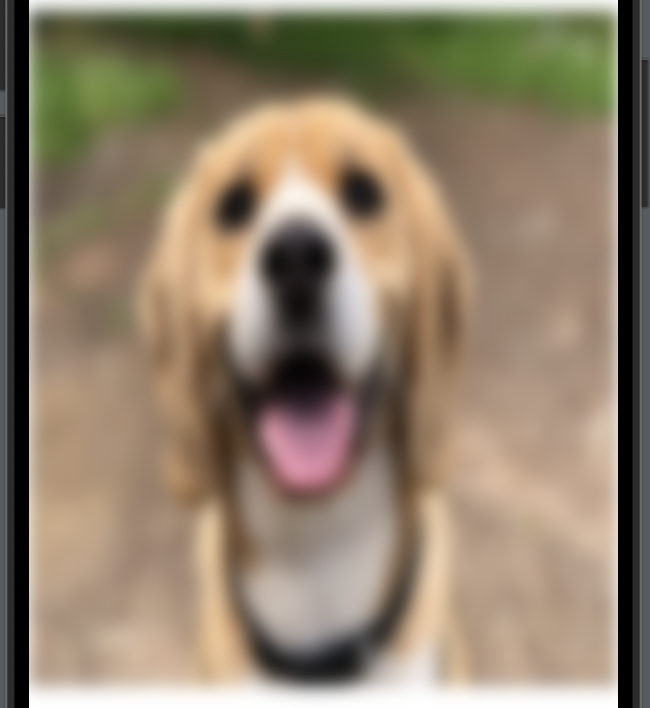
How do you blur an image in SwiftUI?
One thing you often want to add a blur effect to is an image and luckily it’s just as easy to add blur to an image as it is to a text element.
So we will do the same thing as we did above with the text element — we will add a blur effect to our image and set the intensity to 6:
import SwiftUI

struct BlurView: View {
    var body: some View {
        VStack {
            Image("whosagooddog-scaled")
                .resizable()
                .blur(radius: 6)
        }
        .frame(height: 450)
    }
}
The result:
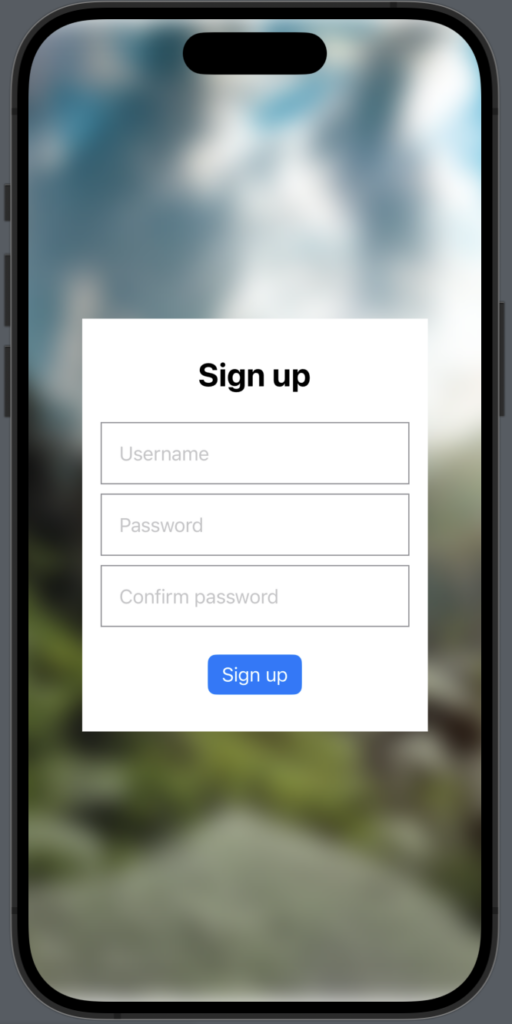
How do you blur the background in SwiftUI?
Many apps have one or more blurred backgrounds, many use the blurred background effect when there is a form to fill out like signup or login.
In the following example, we will make a simple sign-up form with a blurred background:
import SwiftUI

struct BlurBackgroundView: View {
    @State var userName: String = ""
    @State var password: String = ""
    @State var confirmPassword: String = ""

    var body: some View {
        ZStack {
            Image("mounatins")
                .resizable()
                .scaledToFill()
                .ignoresSafeArea()
                .blur(radius: 11.0)

            VStack {

                Text("Sign up")
                    .padding()
                    .font(.title)
                    .bold()

                TextField("Username", text: $userName)
                    .padding()
                    .border(.gray)

                TextField("Password", text: $password)
                    .padding()
                    .border(.gray)

                TextField("Confirm password", text: $confirmPassword)
                    .padding()
                    .border(.gray)

                Button {
                    print("Login time!")
                }label: {
                    Text("Sign up")
                }
                .padding()
                .buttonStyle(
                    .borderedProminent
                )
            }
            .padding()
            .frame(width: 300)
            .background(.white)
        }
    }
}
The result:
Wrap up blur in SwiftUI
SwiftUI blur effect is a powerful tool that enables you to elevate the visual appeal of your application with minimal effort. All you need to do is add the .blur modifier and set the radius(intensity) and wupti you have made a blur effect.
I hope you can use this short and precise guide to the blur modifier in your next application.