MVVM is widely used when developing mobile applications or applications for Windows or Mac. MVVM in swiftUI provides an easy way to separate UI and business logic.
In this tutorial, you will learn what MVVM is and you will get an example of how to implement it in your SwiftUI app easily.
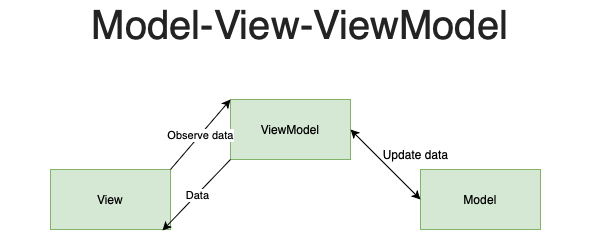
SwiftUI MVVM
The MVVM pattern divides the application into three parts: the Model, which represents the data and business logic, the View, which is the user interface, and the ViewModel, which acts as a bridge between the Model and View, handling data binding, commands, and other UI-related logic. This separation of concerns helps to improve the maintainability and testability of the code.
MVVM is very popular when developing a mobile application and you can find many articles about how you implement MVVM design patterns in a SwiftUI application.
As stated above MVVM has three components: Model, View and ViewModel and they each have their own responsibility:
1. View — A screen or view the user can see where there is data.
2. Model — A object containing data from an API or similar.
3. ViewModel — A class that handles all the business logic and modeling the data for the view to use.
How to implement — Step-by-step
Let’s say we are building a app for a restaurant and we have a API where we get the orders.
Start by creating 3 new groups: Models, Views and ViewModels.

View
Let’s start by creating our order view. Simply create a new SwiftUI view in the Views group and name it OrderView. We will come back to the OrderView a bit later.
Model
The model will be a simple struct that is the blueprint for how the model looks.
A order in the restaurant will contain the following: table number, dish name, and drink name.
struct Order: Codable {
  var tableNumber: Int
  var dishName: String
  var drinkName: String
}
ViewModel
Now it’s time for us to create the ViewModel and it’s quite simple.
Create a new Swift file in the ViewModels group and call it OrderViewModel.
Now our project will look like this:

Make the components work together
Now for the fun part and that is making it all work together.
Let’s start by making a bit of business logic and get the model and ViewModel to work together.
In the OrderViewModel we will first extend the view. Then create a variable that contains an array of orders (OrderModel) and then a function that populates the array.
import Foundation

extension OrderView {
    @MainActor class OrderViewModel: ObservableObject {
        var orders : [OrderModel] = []

        func getOrders(){
            let orderOne = OrderModel(tableNumber: 1, dishName: "Meatballs in tomato sauce", drinkName: "Cola")
            let orderTwo = OrderModel(tableNumber: 1, dishName: "Pasta with salmon", drinkName: "Beer")
            let orderThree = OrderModel(tableNumber: 22, dishName: "Veggie pasta", drinkName: "root beer")

            orders.append(orderOne)
            orders.append(orderTwo)
            orders.append(orderThree)
        }
    }
}
Now we have our ViewModel and Model working together and now we want to hook up our ViewModel to our view.
In our OrderView we will do so that when you open the OrderView we will execute the getOrders() function and we will have a list of orders.
To do so we must start in our ViewModel and add the following: @Published in front of var orders : [OrderModel] = []
@Published var orders : [OrderModel] = []In the OrderView you will start by adding @StateObject var orderVM = OrderViewModel(), and that is our gateway to the viewmodel aka the list of orders and the function that gets the orders.
Then we create a list that loops through the list of orders and simply shows the table number, dish name, and drink name.
The list will also have a onAppear where we execute the getOrders() function.
The full OrderView code is below:
import SwiftUI

struct OrderView: View {
    @StateObject var orderVM = OrderViewModel()

    var body: some View {
        List(orderVM.orders, id: \.tableNumber) { order in
            Text("Table: \(order.tableNumber) have ordered: \(order.dishName) and \(order.drinkName)")
        }
        .onAppear{
            orderVM.getOrders()
        }
    }
}

struct OrderView_Previews: PreviewProvider {
    static var previews: some View {
        OrderView()
    }
}
The code we have written will produce the following:

And that is pretty mush it on how you create a simple MVVM application in SwiftUI.
MVVM will help you to have a clean structure in your application. It’s simple, you have a View and one ViewModel. In the ViewModel you create all the logic, fetch data, and create variables. In the View, you simply create a StateObject of the ViewModel and you let the View decide when to use the different variables and functions.
Swift MVVM with API manager
As you can see MVVM is a great way to organize your code but it has a major drawback and that is you easily end up making duplicate code because you can’t re-use the ViewModel in other places then the view extends and as you know, duplicate code is a big NO NO.
Something you might use in different places in your app is an API request for example if our restaurant app might have two views that fetch the orders and displays them — let’s say we have a kitchen view and a waiter view, both those views want a list of orders to do their job.
In stead of creating the function getOrders with the same logic, we can create an api service class that handles the API request and simply call that from our view models.
Start by creating a class called OrderAPIService.swift and create a function called getOrders(). This service and function will have logic for getting order data and returning a list of orders. Then you can simply call the OrderAPIService -> getOrders()
public class OrderAPIService {
    public static let shared = OrderAPIService()

    func getOrders() -> [OrderModel]{
        var orders = [OrderModel]()

        let orderOne = OrderModel(tableNumber: 1, dishName: "Meatballs in tomato sauce", drinkName: "Cola")
        let orderTwo = OrderModel(tableNumber: 1, dishName: "Pasta with salmon", drinkName: "Beer")
        let orderThree = OrderModel(tableNumber: 22, dishName: "Veggie pasta", drinkName: "root beer")

        orders.append(orderOne)
        orders.append(orderTwo)
        orders.append(orderThree)

        return orders
    }
}
And then in the OrderViewModel change the function getOrders() so it will look like this:
func getOrders(){
    orders = OrderAPIService.shared.getOrders()
}
Now anywhere you need to get the orders you can simply use OrderAPIService.shared.getOrders() — that makes it easier and cleaner when for example you need to change the way you get the orders, you now only need to change it one place.
If you want to implement a real API manager using Alamofire, check out this simple guide I made, where I explain how you can create a good API manager and use retry logic and interceptor: LINK TIL ARTIKEL
SwiftUI MVVM FAQ
What is the benefit of MVVM?
One of the main benefits of using MVVM is that you have an easy structure and a ‘rule’ where to put your code. Code for the view goes in the View file, code for the business logic goes in the ViewModel, and code that represents the data goes in the Model.
Also if you want to add tests to your application, using MVVM makes it easier to write tests.
What is the disadvantage of MVVM?
If you are completely new to programming, MVVM can be a bit hard to understand and therefore might not be a good choice if it’s your first app.
You can’t use one ViewModel in another ViewModel, so you can end up making duplicate code. You can fix that by adding another layer, like an API request layer you can reuse.
If you are creating a small app that will not grow large, it might be a bit overkill to implement MVVM.