If you’re an iOS developer looking to implement robust networking in your Swift applications, you’ve likely encountered the debate between using Apple’s native URLSession and the popular third-party Swift networking library, Alamofire. In this Alamofire tutorial, we’ll explore why Alamofire continues to dominate iOS networking in 2025 and how you can create a soild APIManager and use Alamofire best practices iOS to build better apps.
Whether you’re just starting your Alamofire iOS journey or looking to refine your existing implementation, this guide will provide you with the essential knowledge to make informed decisions about how to use Alamofire in Swift 2025 effectively.
The networking layer is often the backbone of iOS applications, connecting your users to the data and services they need. With the increasing complexity of APIs, authentication requirements, and performance expectations in 2025, choosing the right networking approach has never been more critical for your app’s success.
Why Alamofire Remains the Top Choice for Swift Networking in 2025
In the rapidly evolving world of iOS development, Alamofire has maintained its position as the premier Swift networking library for compelling reasons that become even more relevant in 2025’s development landscape.
Developer Productivity and Code Quality
Alamofire best practices iOS consistently demonstrate that developers can achieve complex networking functionality with significantly less code compared to URLSession implementations. While URLSession requires extensive boilerplate for common tasks like JSON parsing, authentication, and error handling, Alamofire provides these features through an elegant, chainable API.
The time savings are substantial. What might take 50-100 lines of URLSession code can often be accomplished in 10-15 lines with Alamofire, without sacrificing functionality or maintainability. This efficiency translates directly to faster development cycles and reduced maintenance overhead.
Maintenance and Reliability
Unlike homegrown networking solutions that require ongoing maintenance and testing, Alamofire provides proven reliability:
| Reliability Factor | Description | Impact |
|---|---|---|
| Battle-Tested | Used by thousands of production apps with millions of users | Proven stability in real-world conditions |
| Actively Maintained | Regular updates keeping pace with iOS evolution | Always compatible with latest iOS features |
| Well-Tested | Comprehensive test suite across iOS versions | Consistent behavior across different devices |
Setting Up Secure Token Storage
Before building our API manager, we need a way to securely store authentication tokens. iOS Keychain is perfect for this – it’s encrypted and persists across app updates and device restarts.
The KeychainHelper Foundation
import Foundation

final class KeychainHelper {
    static let standard = KeychainHelper()
    private init() {}
}
We’re using the singleton pattern – one instance handles all keychain operations throughout our app. The private initializer ensures no one can create additional instances.
Saving Data to Keychain
func save(_ data: Data, service: String, account: String) {
    let query = [
        kSecValueData: data,
        kSecClass: kSecClassGenericPassword,
        kSecAttrService: service,
        kSecAttrAccount: account,
    ] as CFDictionary

    let status = SecItemAdd(query, nil)

    if status != errSecSuccess {
        print("Error: \(status)")
    }
}
The save method creates a dictionary with keychain attributes. The service and account parameters act like a compound key – think of service as your app identifier and account as the specific data type (like “accesstoken”).
Reading Data Back
func read(service: String, account: String) -> Data? {
    let query = [
        kSecClass: kSecClassGenericPassword,
        kSecAttrService: service,
        kSecAttrAccount: account,
        kSecReturnData: true
    ] as CFDictionary

    var result: AnyObject?
    SecItemCopyMatching(query, &result)
    return result as? Data
}
Notice kSecReturnData: true – this tells the keychain to return the actual data, not just metadata. The &resultparameter is where the keychain stores the found data.
Updating Existing Data
func update(_ data: Data, service: String, account: String) {
    let query = [
        kSecClass: kSecClassGenericPassword,
        kSecAttrService: service,
        kSecAttrAccount: account
    ] as CFDictionary

    let updatedData = [kSecValueData: data] as CFDictionary
    SecItemUpdate(query, updatedData)
}
When you need to update a token (like after refresh), use SecItemUpdate instead of deleting and re-adding.
Cleanup with Delete
func delete(service: String, account: String) {
    let query = [
        kSecClass: kSecClassGenericPassword,
        kSecAttrService: service,
        kSecAttrAccount: account
    ] as CFDictionary

    SecItemDelete(query)
}
Perfect for logout scenarios or when tokens expire.
Why This Approach Works
- Secure: Data is encrypted by the system
- Persistent: Survives app updates and device restarts
- Simple: Clean API that hides keychain complexity
- Flexible: Service/account pattern lets you store multiple types of credentials
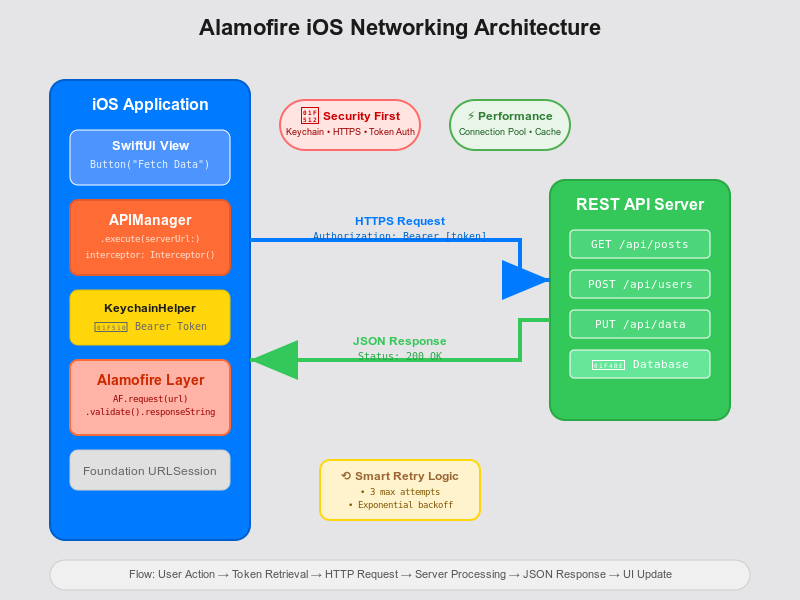
Now that we have secure token storage, let’s build an API manager that uses it automatically
Alamofire in Action: Essential Code Examples for Swift 2025
When building iOS apps that rely on network requests, you need an API manager that handles authentication, retries, and errors gracefully. Let’s build one step by step.
Starting with the Foundation
First, let’s create our basic API manager structure:
import Alamofire

public class APIManager {
    public static let shared = APIManager()

    func execute(serverUrl: String, httpBody: Data?, method: HTTPMethod = .get, parameters: Parameters? = nil, success: @escaping ((AFDataResponse<String>) -> Void), failure: @escaping ((APIError) -> Void)) {
        // Implementation coming next...
    }
}
The singleton pattern gives us a single point of access throughout our app. The execute method is our main workhorse – notice how it accepts flexible parameters and uses completion handlers for async responses.
Adding Request Setup and Validation
Now let’s implement the core request logic:
func execute(serverUrl: String, httpBody: Data?, method: HTTPMethod = .get, parameters: Parameters? = nil, success: @escaping ((AFDataResponse<String>) -> Void), failure: @escaping ((APIError) -> Void)) {
    guard let url = URL(string: serverUrl) else {
        failure(APIError.invalidURL)
        return
    }

    var request = URLRequest(url: url)
    request.httpMethod = method.rawValue
    request.setValue("application/json", forHTTPHeaderField: "Content-Type")
    request.httpBody = httpBody
    request.timeoutInterval = 30

    AF.request(request, interceptor: Interceptor()).validate().responseString { response in
        switch response.result {
        case .success:
            success(response)
        case .failure(let error):
            let apiError = APIError.httpError(
                statusCode: response.response?.statusCode ?? 0,
                message: error.localizedDescription
            )
            failure(apiError)
        }
    }
}
Key points: URL validation happens first, we set standard JSON headers, and notice the interceptor: Interceptor()parameter – that’s where the magic happens.
Automatic Authentication with Interceptors
Alamofire’s RequestInterceptor protocol lets us modify requests automatically:
final class Interceptor: RequestInterceptor {
    func adapt(_ urlRequest: URLRequest, for session: Session, completion: @escaping (Result<URLRequest, Error>) -> Void) {
        var urlRequestToUse = urlRequest

        if let accessToken = KeychainHelper.standard.read(service: "accesstoken", account: "madplan"),
           let tokenString = String(data: accessToken, encoding: .utf8) {
            let cleanToken = tokenString.replacingOccurrences(of: "\"", with: "")
            urlRequestToUse.setValue("Bearer \(cleanToken)", forHTTPHeaderField: "Authorization")
        }

        completion(.success(urlRequestToUse))
    }
}
Every request automatically gets the Bearer token added – no need to remember to add authentication headers manually.
Smart Retry Logic
The retry mechanism is where this API manager really shines:
func retry(_ request: Request, for session: Session, dueTo error: Error, completion: @escaping (RetryResult) -> Void) {
    let requestKey = "\(request.id)"

    Task {
        let currentAttempts = await attemptTracker.getAttempts(for: requestKey)

        if currentAttempts >= 3 {
            await attemptTracker.removeAttempts(for: requestKey)
            completion(.doNotRetry)
            return
        }

        if let response = request.task?.response as? HTTPURLResponse {
            switch response.statusCode {
            case 400...499:
                // Client errors - don't retry
                completion(.doNotRetryWithError(error))
            case 500...599:
                // Server errors - retry after delay
                await attemptTracker.incrementAttempts(for: requestKey)
                completion(.retryWithDelay(3))
            default:
                break
            }
        }

        await attemptTracker.incrementAttempts(for: requestKey)
        completion(.retryWithDelay(3))
    }
}
The logic is smart: client errors (4xx) don’t get retried because they’re usually permanent, but server errors (5xx) do get retried since servers can recover.
Thread-Safe Attempt Tracking
To track retries safely across concurrent requests, we use an actor:
actor RequestAttemptTracker {
    private var attempts: [String: Int] = [:]

    func getAttempts(for key: String) -> Int {
        attempts[key] ?? 0
    }

    func incrementAttempts(for key: String) {
        let current = attempts[key] ?? 0
        attempts[key] = current + 1
    }

    func removeAttempts(for key: String) {
        attempts.removeValue(forKey: key)
    }
}
The actor keyword ensures thread-safe access to our attempts dictionary – crucial for handling multiple concurrent network requests.
Structured Error Handling
Finally, define clear error types:
enum APIError: Error {
    case invalidURL
    case networkError(String)
    case httpError(statusCode: Int, message: String)
    case decodingError
    case noData
    case unauthorized
}
Using Your API Manager
With everything in place, making requests is simple – we will just update the standard ContentView to display the data raw without any parsing:
import SwiftUI

struct ContentView: View {
    @State private var message = "Hello, world!"

    var body: some View {
        VStack {
            Image(systemName: "globe")
                .imageScale(.large)
                .foregroundStyle(.tint)
            Text(message)

            Button("Fetch Data") {
                fetchData()
            }
        }
        .padding()
    }

    private func fetchData() {
        APIManager.shared.execute(
            serverUrl: "https://jsonplaceholder.typicode.com/posts",
            httpBody: nil,
            success: { response in
                DispatchQueue.main.async {
                    self.message = response.value ?? "No data"
                }
            },
            failure: { error in
                DispatchQueue.main.async {
                    self.message = "Error occurred"
                }
            }
        )
    }
}
)
That code will produce something like this:
Cost-Benefit Analysis
While adding any external dependency requires consideration, the benefits of Alamofire far outweigh the costs:
| Cost Factor | Alamofire Impact | Net Benefit |
|---|---|---|
| Development Time | Faster feature implementation, fewer networking bugs | 50-70% reduction in networking code volume |
| Maintenance Overhead | Less custom networking code to maintain and debug | Focus resources on core app features |
| Code Quality | More readable, testable networking implementations | Improved team productivity and onboarding |
| Security Implementation | Built-in security features vs. custom development | Enterprise-grade security without specialist knowledge |
Conclusion: Embracing Alamofire for Modern iOS Development
Understanding how to use Alamofire in Swift 2025 is about more than just making HTTP requests—it’s about building a robust, maintainable networking foundation that can evolve with your application’s needs. The Alamofire best practices iOS we’ve discussed demonstrate why this Swift networking library continues to be the preferred choice for professional iOS development.
Whether you’re building a simple app with basic API integration or a complex enterprise application with sophisticated networking requirements, implementing an Alamofire iOS tutorial approach will serve your project well. The investment in learning Alamofire’s patterns and capabilities pays dividends throughout your application’s lifecycle, enabling you to focus on building great features rather than wrestling with networking complexity.