Building secure iOS authentication for your SwiftUI apps just got easier. This SwiftUI Supabase tutorial shows you how to implement a complete login system using Supabase Auth—the open-source Firebase alternative that’s transforming mobile app development in 2025.
Whether you’re building your first iOS app authentication system or migrating from Firebase, this Supabase Swift integration guide provides everything you need. You’ll learn to create secure sign-in, registration, and session management with clean, production-ready SwiftUI code.
Unlike basic authentication guides, we’ll build a complete system with proper error handling, input validation, and real-world best practices that you can deploy immediately.
What You’ll Learn
By the end of this tutorial, you’ll have a fully functional authentication system that includes:
- User registration with email verification
- Secure sign-in functionality
- Password reset capabilities
- Session management
- Error handling and user feedback
- Clean, reusable SwiftUI components
Prerequisites
Before we dive in, make sure you have:
- Xcode 14+ installed
- Basic knowledge of SwiftUI
- A Supabase account (free tier available)
- iOS 15+ as your deployment target
Setting Up Your Supabase Project
First, let’s set up the backend infrastructure:
1. Create a Supabase Project
- Visit supabase.com and create a new account
- Click “New Project” and fill in your project details
- Wait for your database to initialize (usually takes 2-3 minutes)
- Find your API URL which can be found in Project Settings -> Data API
- Find your API KEY which also can be found in Project
2. Configure Authentication Settings
To simplify this tutorial we are going to disable “Confirm email” – when you go to production, it’s good practice to keep this enabled and set it up correctly. But this tutorial is focused on implementing Supabase inside a iOS application:
- Go to Authentication > Sign In / Providers
- Click on Email
- Disable Confirm email
iOS Project Setup with Supabase
Before we can do anything we need to create a new App, so open Xcode and create a new iOS project with SwiftUI interface.
Implement Supabase
Now it’s time to add Supabase to our project. Luckily this is pretty straightforward and Supabase have created an excellent package we will use.
In Xcode, go to File → Add Package Dependencies and add:
https://github.com/supabase/supabase-swiftThen just add the packages to your project.
Create Supabase service
This Swift code creates a singleton service class that manages the Supabase client connection for your iOS app.
The SupabaseService class acts as a central hub for all Supabase operations, ensuring there’s only one client instance throughout your app’s lifecycle.
This approach provides better resource management and consistency when handling authentication, database queries, and other Supabase features.
import Supabase
import Foundation

class SupabaseService {
    static let shared = SupabaseService()

    let client: SupabaseClient

    private init() {
        // Replace with your actual Supabase credentials
        guard let url = URL(string: "**ENTER YOUR SUPABASE URL**") else {
            fatalError("Invalid Supabase URL")
        }

        self.client = SupabaseClient(
            supabaseURL: url,
            supabaseKey: "**ENTER YOUR SUPABASE API KEY**"
        )
    }
}
static let shared = SupabaseService()– Singleton pattern for app-wide accesslet client: SupabaseClient– The main Supabase client instanceprivate init()– Prevents external instantiation, enforcing singleton pattern
The initializer:
- Creates a URL from the Supabase project URL string
- Uses
guard letto safely unwrap the URL or crash withfatalError - Initializes the
SupabaseClientwith the project URL and anonymous API key
This service acts as a centralized access point for Supabase operations throughout the app. Other classes (like AuthManager) can access the client via SupabaseService.shared.client.
Using Supabase in AuthManager
Now it’s time to create a AuthManager to use our Supabase service and then create the rest of the functions.
As an ObservableObject, it manages authentication state and automatically updates the UI when that state changes.
The class provides a complete authentication system including sign-in, registration, sign-out, and password reset functionality.
import Foundation
import Auth

class AuthManager: ObservableObject {
    @Published var isSignedIn: Bool = false
    @Published var currentUser: User?

    private let supabase = SupabaseService.shared.client

    init() {
        Task {
            await checkAuthStatus()
        }
    }

    @MainActor
    func checkAuthStatus() async {
        do {
            let session = try await supabase.auth.session
            let user = session.user
            self.currentUser = user
            self.isSignedIn = true
        } catch {
            print("No active session: \(error)")
            self.isSignedIn = false
            self.currentUser = nil
        }
    }

    func resetPassword(email: String) async throws {
        try await supabase.auth.resetPasswordForEmail(email)
    }

    func signOut() async {
        do {
            try await supabase.auth.signOut()
            self.currentUser = nil
            self.isSignedIn = false
        } catch {
            print("Sign out error: \(error)")
        }
    }

    func signIn(email: String, password: String) async throws {
        let response = try await supabase.auth.signIn(
            email: email,
            password: password
        )

        self.currentUser = response.user
        self.isSignedIn = true
    }

    @MainActor
    func register(email: String, password: String) async throws {
        let response = try await supabase.auth.signUp(
            email: email,
            password: password
        )

        self.currentUser = response.user
        self.isSignedIn = true
    }
}ObservableObjectprotocol enables SwiftUI reactivity@Published var isSignedIn: Bool– Tracks authentication state@Published var currentUser: User?– Stores current user dataprivate let supabase– Reference to the shared Supabase client
The init() method automatically calls checkAuthStatus() to verify if a user session exists when the app starts. The @MainActor decorator ensures UI updates happen on the main thread.
checkAuthStatus() – Retrieves existing session and updates authentication state
signIn() – Authenticates user with email/password and updates state
register() – Creates new user account and signs them in
signOut() – Ends current session and resets authentication state
resetPassword() – Sends password reset email via Supabase
Methods use async throws for proper error propagation, while sign-out includes internal error handling to prevent app crashes. The @MainActor decorators ensure UI-affecting operations run on the main thread.
Create AUTH flow and SwiftUI Views
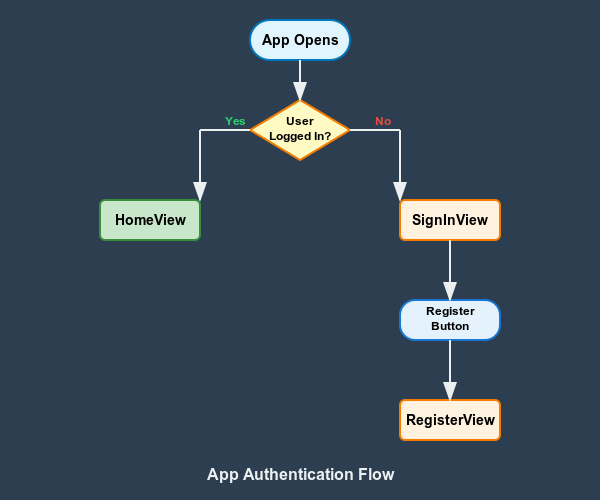
The flow in our app will be: Open the app, the app checks if the user is logged in or not. If the user is logged in to user will see the HomeView and if not logged in the user will see the SignInView. On the SignInView there will be a button that leads the user to RegisterView.
In order for us to create the flow above, we need a class that knows if the user is logged in or not – we already made that and it’s called AuthManager, now it’s time to create the views we need and use the AuthManager
Building the views
Next up we are going to create the views for the app. We will have four views: ContentView, HomeView, RegisterView and SignInView.
Pro tip: Create a folder called Views and place your views inside the folder.
SignInView.swift
This SwiftUI code creates a sign-in screen for Supabase authentication. Here’s the breakdown:
import SwiftUI

struct SignInView: View {
    @EnvironmentObject var authManager: AuthManager
    @State private var email: String = ""
    @State private var password: String = ""

    var body: some View {
        NavigationStack {


        VStack(spacing: 40) {
            Text("Supabase AUTH tutorial")
                .font(.title)
                .bold()


            VStack(alignment: .leading, spacing: 20) {
                VStack(alignment: .leading, spacing: 3) {
                    Text("Enter your email below:")
                        .font(.subheadline)
                        .foregroundColor(.secondary)
                    TextField("Enter your email", text: $email)
                        .textFieldStyle(RoundedBorderTextFieldStyle())
                }

                VStack(alignment: .leading, spacing: 3) {
                    Text("Enter your password below:")
                        .font(.subheadline)
                        .foregroundColor(.secondary)
                    SecureField("Enter your password", text: $password)
                        .textFieldStyle(RoundedBorderTextFieldStyle())
                }

            }

            VStackLayout(spacing: 10) {
                Button(action: {
                    Task {
                        do {
                            try await authManager.signIn(email: email, password: password)
                        } catch {
                            print("Login failed: \(error.localizedDescription)")
                        }
                    }
                }) {
                    Text("Login using Supabase")
                        .font(.headline)
                        .foregroundColor(.white)
                        .padding()
                        .background(Color.blue)
                        .cornerRadius(8)
                }

                NavigationLink(destination:
                                RegisterView()
                                    .environmentObject(authManager)
                ) {
                    Text("Register")
                        .font(.subheadline)
                }

            }
        }
        .padding()
        }
    }
}

#Preview {
    SignInView()
}
Key Components
@EnvironmentObject var authManager: AuthManager– Shared authentication manager@Statevariables for email and password inputNavigationStackfor screen navigation
The layout uses nested VStack containers with:
- Title text
- Email
TextFieldand passwordSecureFieldwith labels - Login button that calls
authManager.signIn()in an asyncTask NavigationLinkto the registration screen
When “Login using Supabase” is tapped:
- Creates async task
- Calls
authManager.signIn(email:password:) - Handles errors with
do-catch
RegisterView.swift
This code creates a registration screen with great user experience including loading states, error handling, and user feedback alerts:
import SwiftUI

struct RegisterView: View {
    @EnvironmentObject var authManager: AuthManager

    @State private var email: String = ""
    @State private var password: String = ""
    @State private var confirmPassword: String = ""
    @State private var isLoading = false
    @State private var showError = false
    @State private var errorMessage: String = ""

    var body: some View {
        VStack(spacing: 40) {
            Text("Register to Supabase")
                .font(.title)
                .bold()


            VStack(alignment: .leading, spacing: 20) {
                VStack(alignment: .leading) {
                    Text("Enter email below:")
                        .font(.subheadline)
                        .foregroundColor(.secondary)
                    TextField("Enter email", text: $email)
                        .textFieldStyle(RoundedBorderTextFieldStyle())
                }

                VStack(alignment: .leading) {
                    Text("Enter password below:")
                        .font(.subheadline)
                        .foregroundColor(.secondary)
                    SecureField("Enter password", text: $password)
                        .textFieldStyle(RoundedBorderTextFieldStyle())
                    SecureField("Re-enter password", text: $confirmPassword)
                        .textFieldStyle(RoundedBorderTextFieldStyle())
                }

            }
            Button(action: {
                Task {
                    do {
                        isLoading = true
                        try await authManager.register(email: email, password: password)
                        isLoading = false
                    }catch {
                        isLoading = false
                        errorMessage = error.localizedDescription
                        print("Registration failed: \(error.localizedDescription)")
                        showError = true
                    }
                }
            }) {
                HStack {
                    if isLoading {
                        ProgressView()
                            .progressViewStyle(CircularProgressViewStyle(tint: .white))
                            .scaleEffect(0.8)
                    } else {
                        Text("Signup using Supabase")
                    }
                }
                    .font(.headline)
                    .foregroundColor(.white)
                    .padding()
                    .background(Color.blue)
                    .cornerRadius(8)
            }
        }
        .alert("Registration failed!", isPresented: $showError) {
            Button("OK") {
                showError = false
            }
        } message: {
            Text("\(errorMessage)")
        }
        .padding()
    }
}

#Preview {
    RegisterView()
}
@EnvironmentObject var authManager: AuthManager– Shared authentication manager@Statevariables for email, password, and confirmPassword input@State private var isLoading: Bool– Loading state for button@State private var showError: Bool– Error alert trigger@State private var errorMessage: String– Stores error details for display
The layout uses VStack containers with:
- “Register to Supabase” title
- Email
TextFieldwith label - Two password
SecureFieldinputs (password and confirmation) with labels - Smart signup button that shows loading indicator or text
- Error alert dialog for registration failures
The signup button now includes full implementation:
- Loading State: The signup button shows a
ProgressViewspinner during registration and displays appropriate text or loading indicator. - Error Handling: Comprehensive error management that captures error messages and displays them in user-friendly alerts.
- Visual Feedback: Loading spinner provides immediate feedback that the registration process is active.
HomeView.swift
This SwiftUI code creates a simple home screen shown after successful authentication. Here’s the breakdown:
import SwiftUI

struct HomeView: View {
    @EnvironmentObject var authManager: AuthManager

    var body: some View {
        Text("Hello, World!")

        Button {
            Task {
                await authManager.signOut()
            }

        }label: {
            Text("Sign Out")
        }
    }
}

#Preview {
    HomeView()
}
@EnvironmentObject var authManager: AuthManager– Shared authentication manager- Basic UI with placeholder content and sign-out button
The layout contains:
- Sign-out button with complete logout functionality
The sign-out button now includes full implementation:
- Creates an async
Task - Calls
authManager.signOut()to end the user session - The
AuthManagerhandles the logout process and automatically updates authentication state - SwiftUI reactively switches back to the sign-in screen when
isSignedInbecomes false
ContentView.swift
This SwiftUI code creates the main app controller that manages authentication state. Here’s the breakdown:
import SwiftUI
struct ContentView: View {
    @StateObject private var authManager = AuthManager()

    var body: some View {
        if authManager.isSignedIn {
            HomeView()
                .environmentObject(authManager)
        }else {
            SignInView()
                .environmentObject(authManager)
        }
    }
}
#Preview {
    ContentView()
}
@StateObject private var authManager = AuthManager()– Creates and owns the authentication manager instance- Conditional view rendering based on authentication state
The view uses a simple if-else statement to determine which screen to show:
- If signed in: Shows
HomeView() - If not signed in: Shows
SignInView()
Both views receive the authManager as an environment object using .environmentObject(authManager).
This acts as the root view that automatically switches between the authentication flow and the main app content based on the user’s login status.
When authManager.isSignedIn changes, SwiftUI automatically updates the displayed view.
ForgotPasswordView.swift
The following code creates a password reset screen with enhanced user experience features including loading states, success feedback, and proper form validation.
import SwiftUI

struct ForgotPasswordView: View {
    @EnvironmentObject var authManager: AuthManager
    @State private var email: String = ""
    @State private var isLoading = false
    @State private var showSuccess = false
    @Environment(\.dismiss) private var dismiss

    var body: some View {
        NavigationStack {
            VStack(spacing: 40) {
                Text("Forgot Password")
                    .font(.title)
                    .bold()

                VStack(alignment: .leading, spacing: 20) {
                    VStack(alignment: .leading, spacing: 3) {
                        Text("Enter your email below:")
                            .font(.subheadline)
                            .foregroundColor(.secondary)
                        TextField("Enter your email", text: $email)
                            .textFieldStyle(RoundedBorderTextFieldStyle())
                            .keyboardType(.emailAddress)
                            .autocapitalization(.none)
                    }
                }

                VStackLayout(spacing: 10) {
                    Button(action: {
                        Task {
                            isLoading = true
                            try? await authManager.resetPassword(email: email)
                            showSuccess = true
                            isLoading = false
                        }
                    }) {
                        HStack {
                            if isLoading {
                                ProgressView()
                                    .progressViewStyle(CircularProgressViewStyle(tint: .white))
                                    .scaleEffect(0.8)
                            } else {
                                Text("Send Reset Link")
                            }
                        }
                        .font(.headline)
                        .foregroundColor(.white)
                        .padding()
                        .background(Color.blue)
                        .cornerRadius(8)
                    }
                    .disabled(email.isEmpty || isLoading)

                    Button("Back to Sign In") {
                        dismiss()
                    }
                    .font(.subheadline)
                }
            }
            .padding()
            .alert("Reset Link Sent!", isPresented: $showSuccess) {
                Button("OK") {
                    dismiss()
                }
            } message: {
                Text("We've sent a password reset link to \(email). Please check your inbox.")
            }
        }
    }
}

#Preview {
    ForgotPasswordView()
}
@EnvironmentObject var authManager: AuthManager– Shared authentication manager@State private var email: String– Email input field@State private var isLoading: Bool– Loading state for button@State private var showSuccess: Bool– Success alert trigger@Environment(\.dismiss)– SwiftUI environment value to dismiss the view
The layout includes:
- “Forgot Password” title
- Email input field with proper keyboard type and capitalization settings
- Smart reset button that shows loading indicator or text
- “Back to Sign In” button for navigation
- Success alert dialog
Loading State: The reset button shows a ProgressView spinner while processing and is disabled during the operation.
Form Validation: The button is disabled when the email field is empty or during loading.
Success Feedback: An alert appears when the reset email is sent, providing clear user confirmation.
Keyboard Optimization: Email field uses .emailAddress keyboard type and disables auto-capitalization.
Conclusion
All done! You’ve built a complete, production-ready authentication system with SwiftUI and Supabase that includes secure registration, sign-in, password reset, and session management.
Get the Complete Code
Download the full source code on GitHub →
What will you build next? This authentication foundation is ready for any iOS app idea – from social platforms to productivity tools. Share your projects in the comments!