Most applications nowadays use the internet. Whether you’re developing an application for the sole purpose of checking the network connection or simply trying to optimize user experience, knowing how to check network connectivity in your Swift application can be a game-changer.
In this guide, we will check the network connection inside a SwiftUI application using NWPathMonitor, which was introduced in iOS 12.
NB: Before diving into this guide, it’s a good idea to test on an iPhone and not the simulator.
How to check network connectivity in Swift?
To check the network connection using native functions we want to use NWPathMonitor. To use NWPathMinitor we first have to import Network.
In the following example, we will create a swift class called NetworkHelper and in that class, we will create two functions: startMonitoring() and stopMonitoring(). We will then use this NetworkHelper in a simple SwiftUI view that writes the network connection:
NetworkHelper.swift:
import Foundation
import Network

@Observable
class NetworkHelper: ObservableObject {

    static let shared = NetworkHelper()
    private let monitor: NWPathMonitor
    public private(set) var networkStatus: NWPath.Status = .requiresConnection
    private let queue = DispatchQueue(label: "NetworkMonitor")

    init() {
        monitor = NWPathMonitor()
    }

    func startMonitoring() {

        monitor.start(queue: queue)

        monitor.pathUpdateHandler = { path in
            self.networkStatus = path.status
        }
    }

    func stopMonitoring() {
        monitor.cancel()
    }
}
NetworkTesterView.swift:
import SwiftUI

struct NetworkTesterView: View {
    let networkMonitor = NetworkHelper.shared

    var body: some View {
        VStack {
            switch networkMonitor.networkStatus {
            case .satisfied:
                Text("satisfied")
            case .unsatisfied:
                Text("unsatisfied")
            case .requiresConnection:
                Text("requiresConnection")
            @unknown default:
                Text("Network status error")
            }
        }
        .padding()
        .onAppear {
            networkMonitor.startMonitoring()
        }
    }
}
NWPath Capabilities
In our example above we created a simple application that checks what the status is on the network, but we can do so much more.
On the NWPath alone we can also check if we are using a cellular network, if the network supports DNS and/or supports IPv4 & IPv6.
Is network Cellular with NWPathMonitor
Let’s say you have a network-heavy application like Netflix, you might want to let your users know they are using cellular because it can be quite expensive.
Apple has made that quite easy for us to check — they have put the boolean called isExpensive on the NWPath object.
path.isExpensiveCheck if the NWPath supports DNS
To check if the path has DNS server configured you can use the dedicated boolean supportsDNS:
path.supportsDNSCheck if NWPath can route IPv4 and/or IPv6
In order to check if the path can route IPv4 or IPv6 you can use the following booleans:
path.supportsIPv4
path.supportsIPv6
Check if NWPath is in low data mode
Apple has also created a boolean to check if the path uses a interface that is in Low Data Mode:
path.isConstrainedNetwork Description
The properties above are created as booleans you can easily use them in your application to customize the user experience. If you just want to display different information about the network you can just use the following property:
path.debugDescriptionNWPath Interfaces
NWPath Interfaces refers to the Network Path in Apple operating systems. It provides information about the state of the network interface, such as whether the device is connected to the internet, what type of connection it has (e.g., Wi-Fi, cellular), and whether the connection is constrained in any way (e.g., limited data).
There are 4 types of interfaces: cellular, loopback, wifi, wiredEthernet and other.
Complete network application
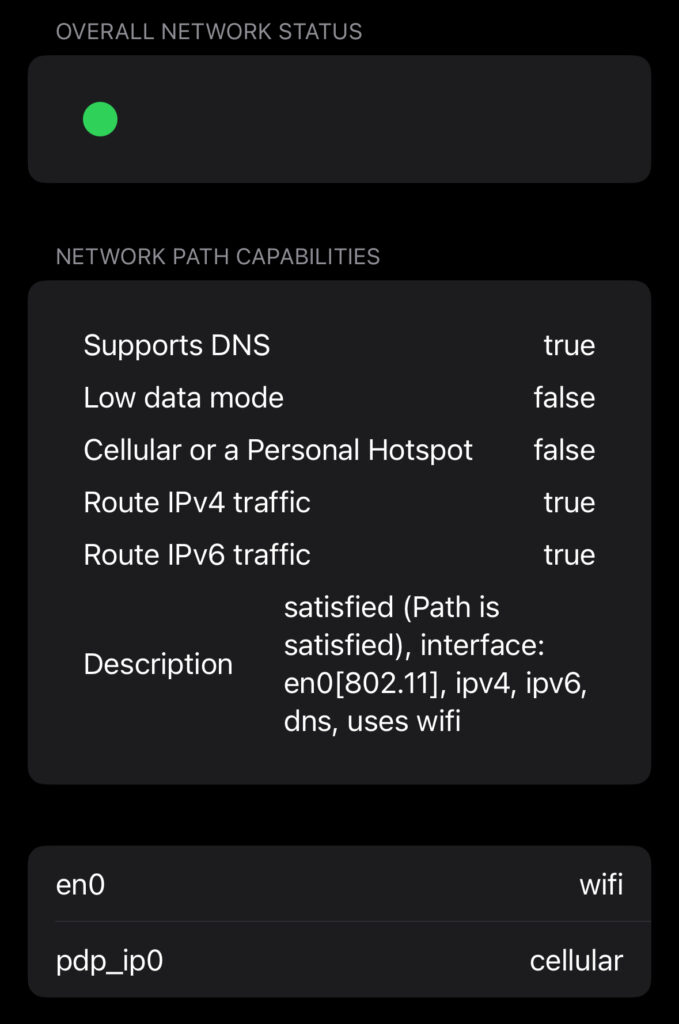
In the following code example, I have combined all of the above into a simple SwiftUI application that displays the different properties of the connected network:
NetworkHelper.swift
import Foundation
import Network

@Observable
class NetworkHelper: ObservableObject {

    static let shared = NetworkHelper()
    private let monitor: NWPathMonitor
    public private(set) var networkStatus: NWPath.Status = .requiresConnection
    private let queue = DispatchQueue(label: "NetworkMonitor")
    var networkPath: NWPath?

    init() {
        monitor = NWPathMonitor()
    }

    func startMonitoring() {

        monitor.start(queue: queue)

        monitor.pathUpdateHandler = { path in
            self.networkPath = path

        }
    }

    func getInterfaces(interface: NWInterface) -> (name: String, type: String) {
        var type: String = ""
        switch interface.type {
        case .cellular:
            type = "cellular"
        case .loopback:
            type = "loopback"
        case .wifi:
            type = "wifi"
        case .wiredEthernet:
            type = "wiredEthernet"
        case .other:
            type = "other"
        }

        return (name: interface.name, type: type)
    }

    func stopMonitoring() {
        monitor.cancel()
    }
}
NetworkTesterView.swift:
import SwiftUI

struct NetworkTesterView: View {
    let networkMonitor = NetworkHelper.shared
    var body: some View {
        Form{
            Section("Overall network status") {
                VStack {
                    switch networkMonitor.networkPath?.status {
                    case .satisfied:
                        Circle()
                            .fill(.green)
                            .frame(width: 20, height: 20)
                    case .unsatisfied:
                        Circle()
                            .fill(.red)
                            .frame(width: 20, height: 20)
                    case .requiresConnection:
                        Circle()
                            .fill(.yellow)
                            .frame(width: 20, height: 20)
                    @unknown default:
                        Circle()
                            .fill(.gray)
                            .frame(width: 20, height: 20)
                    }
                }
                .padding()
            }

            Section("Network path Capabilities") {
                VStack(spacing: 10) {
                    HStack {
                        Text("Supports DNS")
                        Spacer()
                        Text(String(networkMonitor.networkPath?.supportsDNS ?? false))
                    }
                    HStack {
                        Text("Low data mode")
                        Spacer()
                        Text(String(networkMonitor.networkPath?.isConstrained ?? false))
                    }
                    HStack {
                        Text("Cellular or a Personal Hotspot")
                        Spacer()
                        Text(String(networkMonitor.networkPath?.isExpensive ?? false))
                    }
                    HStack {
                        Text("Route IPv4 traffic")
                        Spacer()
                        Text(String(networkMonitor.networkPath?.supportsIPv4 ?? false))
                    }
                    HStack {
                        Text("Route IPv6 traffic")
                        Spacer()
                        Text(String(networkMonitor.networkPath?.supportsIPv6 ?? false))
                    }
                    HStack {
                        Text("Description")
                        Spacer()
                        Text(String(networkMonitor.networkPath?.debugDescription ?? ""))
                    }
                }
                .padding()
            }

            ForEach(networkMonitor.networkPath?.availableInterfaces ?? [], id: \.self) { result in
                HStack {
                    Text(networkMonitor.getInterfaces(interface: result).name)
                    Spacer()
                    Text(networkMonitor.getInterfaces(interface: result).type)
                }
            }
        }
        .onAppear {
            networkMonitor.startMonitoring()
        }
    }
}
The result:

Conclusion
Checking network state is particularly useful for developers who want to optimize their applications for various network conditions, ensuring a smooth user experience regardless of the network environment.
By accessing NWPath Interfaces, developers can adjust their app’s behavior dynamically based on the available network conditions, such as reducing bandwidth-intensive operations on slow or metered connections.
I hope you can use this guide in your next application — happy coding 🙂